

Guest Post by Mr. Nikhil M, Sr. Application Engineer. BEACON India
In mechanical design, understanding how components move is essential. With SOLIDWORKS CAD Premium and SOLIDWORKS Simulation solutions, Motion Analysis lets us simulate and study this behaviour, offering valuable performance insights. In this blog, we’ll explore a 4-bar linkage using a simple 2D sketch—a fast, efficient way to grasp core kinematics without the complexity of 3D models.
What is a 4-Bar Linkage?
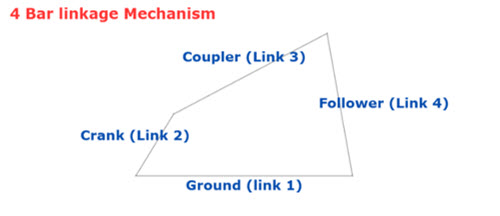
A four-bar linkage is a fundamental mechanical system composed of four rigid links connected by four revolute joints (hinges). One of these links is fixed, serving as the ground link, while the others move in relation to it. By varying the lengths of the links, you can achieve a wide range of output motions, making this mechanism a crucial component in many machines. Common applications include windshield wipers, certain suspension systems, and foldable chairs.
The Importance of Blocks in 2D Motion Analysis
For SOLIDWORKS Motion to recognize the individual parts of a mechanism, you need to use blocks. A standard 2D sketch won’t work because all the lines are treated as one rigid body, preventing you from defining motion between them.
Here’s why blocks are essential:
- Isolate Components: Blocks allow you to define each part of your mechanism as a separate, movable body.
- Create a Virtual Assembly: By treating each component as a block, you can make a 2D sketch behave like a true assembly with defined motion.
- Enable Motion Analysis: SOLIDWORKS Motion needs these individual “links” to identify and analyse their relative movement.
Setting Up Your 2D Sketch with Blocks
This is the key to a successful 2D motion analysis. You’ll create a 2D assembly using blocks in Layout.
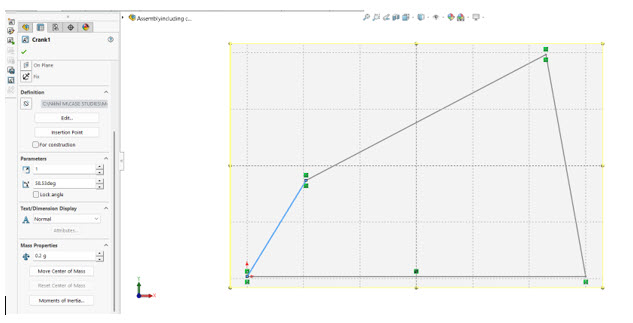
- Sketch Your Assembly: Start by drawing the first link of your 4-bar assembly, for example, the crank
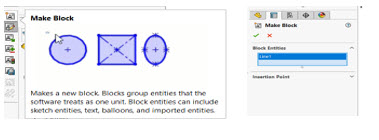
- Create the Block: Select all the sketch entities that make up this first link. Then, go to Tools > Block > Make Block. This converts the selected entities into a single block. You’ll be prompted to define an insertion point, which is the point that will serve as the pivot for a revolute joint.
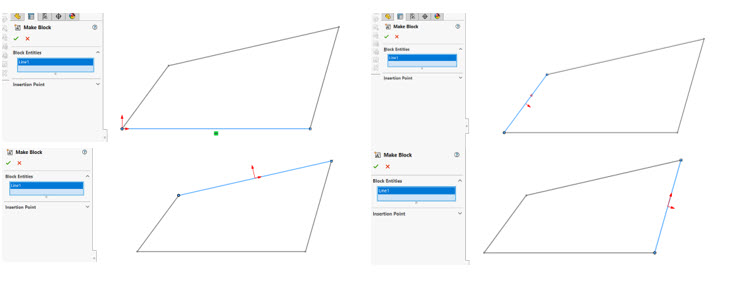
3. Repeat for All Links: Repeat this process for each of the other three links in your 4-bar assembly. You will now have four distinct blocks representing your four links.
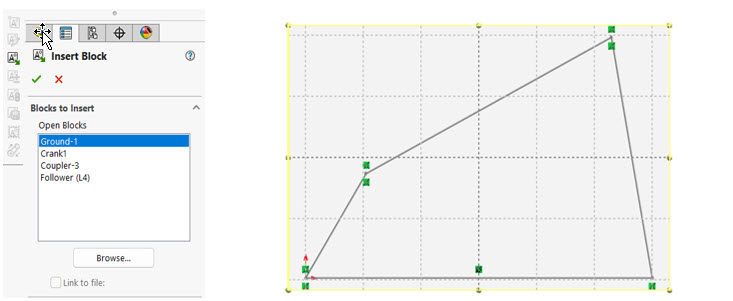
4. Assemble the Blocks: Create a new assembly use standard sketch relations like Coincident to “assemble” the blocks at their pivot points, just as you would with a physical assembly.
5. Setting Up Mass Properties for Motion Analysis in SOLIDWORKS
When preparing a Motion Analysis study, accurate mass properties are essential for realistic results. By default, SOLIDWORKS assigns estimated mass and moment of inertia values to each block, treating it as a uniform steel block with the center of mass at its geometric center. You can fine-tune these properties in the Block Property Manager.
- Automatic Estimates: Each block in your layout sketch is assigned default mass and moment of inertia values, based on a uniform steel block.
- Center of Mass Defaults: By default, the center of mass is positioned at the geometric center of the block.
- Full Control: You can override these defaults to match real-world materials, shapes, or custom weights.
- Simple Editing: Adjust the mass, center of mass, and moments of inertia directly in the Block Property Manager under Mass Properties.
Why It Matters: Accurate mass data ensures your Motion Analysis captures real-world dynamics — from smooth operation to predicting peak loads.
Bringing it to Life with SOLIDWORKS Motion Once your 2D sketch is set up with blocks and constraints, it’s time to leverage the power of SOLIDWORKS Motion:
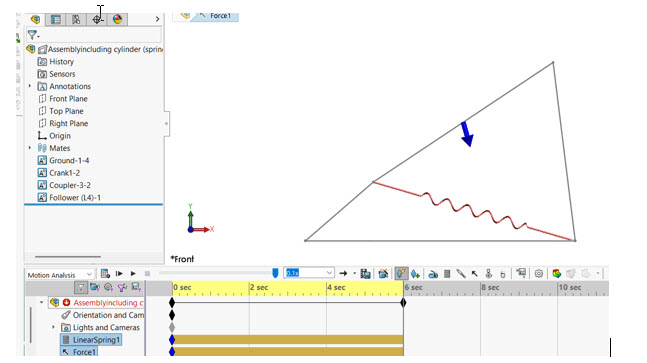
- Access SOLIDWORKS Motion: Navigate to Tools > Add-Ins and ensure that SOLIDWORKS Motion is checked.
- Create a New Motion Study: Go to the “SOLIDWORKS Motion” tab and click on “New Motion Study.”
- Define the Motion Analysis Type: In the Motion Study properties, select “Motion Analysis.”
- Add Forces and Springs: You can add forces and springs to drive the mechanism. Use the Force feature to apply a vertical load to a specific point on a link. Use the Spring feature to connect two points on different links to simulate a spring’s effect, defining its stiffness and free length.
- Set Simulation Parameters: Define the Analysis time and frames per second in the Motion Study properties.
- Run the Simulation: Click the “Calculate” button. SOLIDWORKS Motion will now simulate the movement of 4-bar linkage.
Analysing the Motion and Reaction Forces
Once the simulation is complete, the real insights begin. SOLIDWORKS Motion Analysis “Results and plots” option allows you to plot various parameters, including:
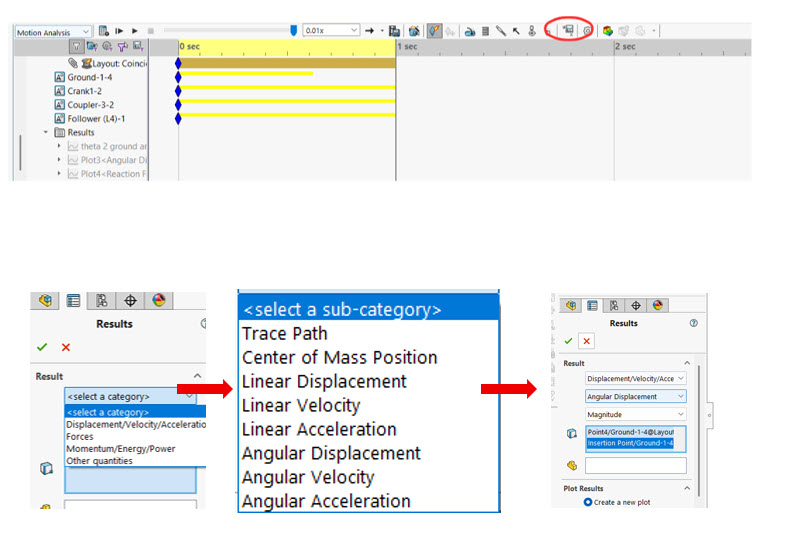
- Angular Displacement, Velocity, and Acceleration:
- Linear Displacement, Velocity, and Acceleration:
- Reaction Force vs. Angular Displacement:
The Benefits of 2D Motion Analysis
While 3D simulations offer more visual richness, analysing a 2D sketch provides several key advantages:
- Simplicity and Speed: Setting up a 2D motion analysis is faster and less computationally intensive.
- Focus on Core Kinematics: It allows you to concentrate on the fundamental motion relationships between the links.
- Early-Stage Design: It’s an excellent tool for quickly evaluating different linkage configurations early in the design process.
Conclusion
Simulating 2D sketch with SOLIDWORKS Motion Analysis by defining components as blocks is an effective way to learn kinematics and explore motion simulation. Even simple sketches can come alive, delivering valuable insights into mechanical behaviour.
Author
Guest Post by Mr. Nikhil M, Sr. Application Engineer. BEACON India
To know more details, please reach out to us at:
Phone: +91 7406663589
Email ID: info@beacon-india.com Website: http://beacon-india.com

")